EVM Safe in zkSync. Part II: Recover Assets with EVM Interpreter
Have your funds become stuck in the zkSync network Safe (formerly known as Gnosis Safe) address, and you don’t know how to recover them? Good news — the latest zkSync update, which introduced the EVM Interpreter, made fund recovery possible! Utilizing canonical safe contracts deployed by Protofore, you can now easily recreate multisigs and recover funds in the zkSync network.
This article is part II of a two-part series and covers the topic of fund retrieval/transfer. If you still need to recover an EVM Safe, head to Part I [1] and go through Step 1. Safe Recreation section to choose the most suitable method.
Both guides present methods that do not involve third-party backend/frontend services. However, they will require some programming knowledge.
If the safe contract is deployed and ready, it is time for a fund recovery! Here is a breakdown of the next step:
- Step 2: Token Transfer:
- Option 1: Protofire Safe UI [2]— easiest UX if the network is supported;
- Option 2: Using safe-cli [3] — suitable if all signers are in the same environment. No backend services are required.
- Option 3: Using safe-core-sdk [4] — allows proposing/executing transactions directly to the blockchain or backend service, but requires some tech knowledge.
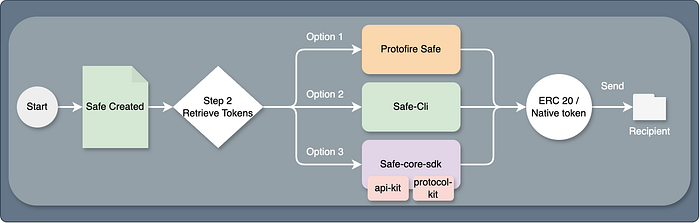
Options on funds retrieval. Different workflows and options — same result
Note: If you wish to learn how and why fund retrieval works in the zkSync network (and didn’t before), head to Part I — Why Is it Possible Now? Section.
Step 2. Token Transfer
Assets can be transferred in multiple ways:
- The first one is the easiest and does not require technical knowledge.
- The second option does not rely on the frontend or backend services (only the RPC node) and is used when all signers are loaded in the same environment.
- The third option is using safe-core-sdk libraries. It will also include a multiple-owner signature flow using only a protocol kit.
Option 1. Protofire Safe UI:
If a recreated safe is supported in Protofire Safe UI [2], it is possible to send the asset directly from the website. UI offers multiple ways to do so. The most straightforward one — selecting a token in the assets tab.
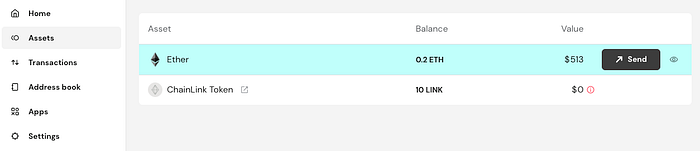
Token assets in Protofire Safe UI. ZkSync Sepolia example
However, sometimes token data may be missing because of the transfer event and multisig creation timelines. Therefore, tokens can also be transferred using the transaction builder. For a native token, since the ABI does not exist, it is enough to pass an empty array [].

Native token transfer example using transaction builder
To transfer ERC20 or NFT tokens, the flow would be similar, but with the addition of the missing token contract data to the Enter Address and Enter ABI inputs:
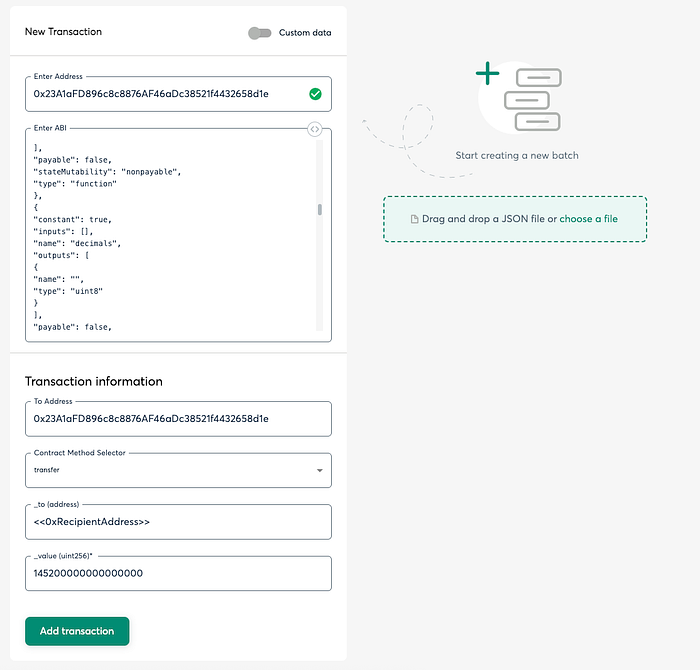
ERC20 or NFT token example using transaction builder
Successful transaction examples:
- Native token transfer: 0x5285cab6a1af909190407756a40447d3788c21d1b5d0db059fea206524364b09
Option 2:
This method allows interaction with safes only via the command line (no backend service is required). Installation commands are available at the safe-cli [3] repository.
Example of an initialization command:
docker run -it safeglobal/safe-cli safe-cli 0xA4A16b02A9D7b4465cE6962C048AEcb8B40FBd72 https://rpc.ankr.com/zksync_era_sepolia
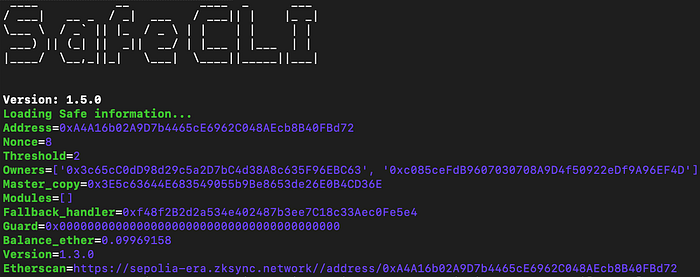
Data fetched from blockchain
The Safe-cli repository has detailed examples and documentation (cases can be found in the Usage section). Here are some of the token transfer commands:
send-ethersend-erc20send-erc721
The first step when using safe-cli could be pre-loading owners and only then performing agreed-upon commands.
Notes
- If signers can not be in the same environment, use tx-service (third-party backend service) as suggested in this issue (#178) or try protocol-kit (Option 3).
- ⚠️ For enhanced security, a hardware wallet option is also possible (and recommended for mainnet currency handling).

Helper commands for owner loading
Once all owners are loaded, execute the transfer command:
send_ether 0xc085ceFdB9607030708A9D4f50922eDf9A96EF4D 883837
The result: (0x441e…72e312):
Sent tx with tx-hash 0x441e1b839648893a8fe74bdef164feccea0a2d2d11461608ce6736a4e572e312 and safe-nonce 10, waiting for receiptTx was executed on block-number=5172821, fees deducted=0.0000101727
It is also visible in the Protofire Safe UI!
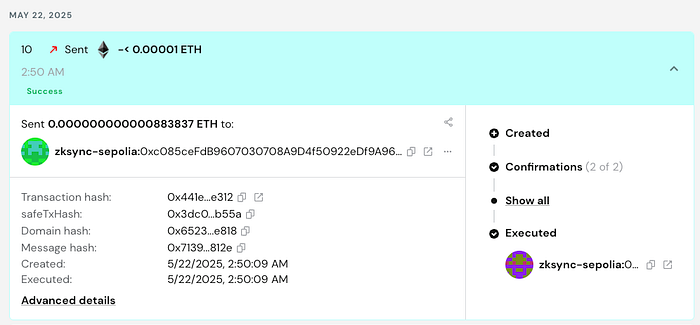
Safe-cli transaction indexed and visible in Protofire Safe UI
Option 3: Using the Safe-Core-SDK
Safe Global has multiple packages under the safe-core-sdk [4] repository. They are useful when interactions with safe wallets are outside the main UI (mostly used for dApps with a multisig focus).
Two packages are for transaction handling and can also be used when owners are in different execution environments. Both libraries are:
- Protocol kit — for safe transaction creation and execution.
- API Kit — (optional) available if the transaction service supports the network. Used to fetch or put transaction data into the queue in the backend.
Packages used:
yarn add @safe-global/api-kit@^3.0.1 @safe-global/protocol-kit@^6.0.3 @safe-global/safe-ethers-lib@^1.9.4 @safe-global/types-kit@^2.0.1 ethers@^6.13.5
Notes
- The code provided is just for example purposes; it is intended to show how to interact with the libraries and does not cover in-depth security methods.
- ⚠️ Secure your keys (use software accounts, hardware wallets, or other alternatives). Don’t use plain private key—encrypt, use secrets, or explore additional options.
- Always verify that the signed transaction is valid and its purpose is as intended. Read more helpful tips in this article [5] by Safe.
Step 1: Initialize Safe (protocol-kit)
//import Safe from '@safe-global/protocol-kit'const SIGNER = // your preferred way of fetching signer// or using ethAdapterconst SAFE_ADDRESS = '0xA4A16b02A9D7b4465cE6962C048AEcb8B40FBd72'const RPC_URL = 'https://example.zksync.sepolia.rpc'// Continue with async function:const protocolKit = await Safe.init({ provider: RPC_URL, signer: SIGNER, safeAddress: SAFE_ADDRESS })
Step 2: Form a native token transfer transaction (protocol-kit)
//import { MetaTransactionData, OperationType } from '@safe-global/types-kit'const OWNER_ADDRESS = '0xc085ceFdB9607030708A9D4f50922eDf9A96EF4D'const safeTransactionData: MetaTransactionData = { to: OWNER_ADDRESS, value: ethers.parseEther('0.00000001').toString(), // send 0.00000001 ETH data: '0x', operation: OperationType.Call}const safeTransaction = await protocolKit.createTransaction({ transactions: [safeTransactionData]})
Step 3: Sign the transaction (protocol-kit)
const safeTxHash = await protocolKit.getTransactionHash(safeTransaction)const signature = await protocolKit.signHash(safeTxHash)
For the 4th step, proceed with one of these scenarios:
- A — Use API-kit to propose a transaction to the backend service;
- B — Use protocol-kit (no backend service) to execute the transaction directly in the blockchain if the safe threshold is 1.
- C — Use protocol-kit (no backend service) to form, sign, and execute a transaction with multiple owners (threshold >1);
Step 4A: Propose or execute the transaction via API-kit:
This option interacts with the transaction service [6] (a third-party or self-hosted backend service) that stores pending data in the queue.
This data can be fetched again and passed for execution via protocol-kit, or executed directly in the UI (this method is chosen).
//import SafeApiKit from '@safe-global/api-kit'const apiKit = new SafeApiKit({ chainId: BigInt(300), txServiceUrl: 'https://transaction-zksync-sepolia.safe.protofire.io/api'});await apiKit.proposeTransaction({ safeAddress: SAFE_ADDRESS, safeTransactionData: safeTransaction.data, safeTxHash, senderAddress: OWNER_ADDRESS, senderSignature: signature.data })
After a successful proposal, users can see and execute it in the UI.
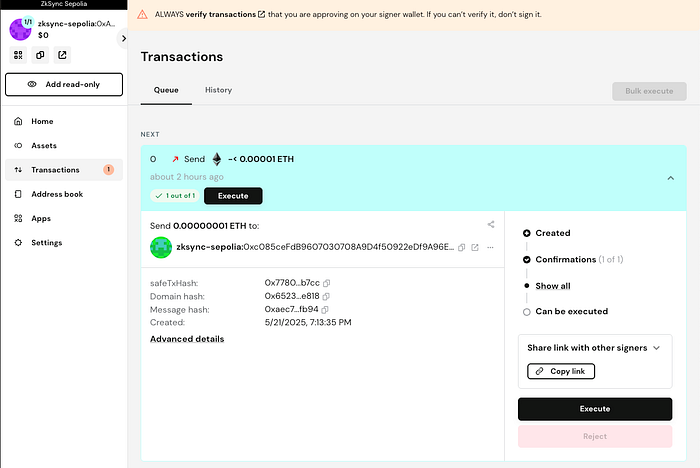
Transaction proposed via api-kit appeared in the queue
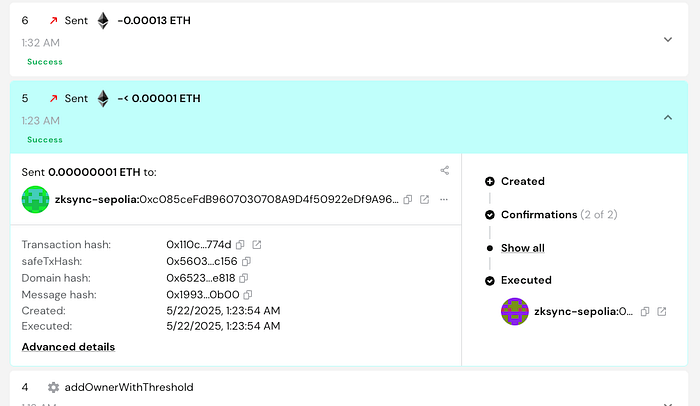
The transaction is executed successfully:
- 0x3799e2cd66e29702a8230f82ede5948cfb4ec254a4344960e50586ca33cbad16 (native token transfer example)
However, if the transaction service is missing, API-Kit can’t be used; therefore:
Step 4B: Validate and execute the transaction data using protocol-kit.
- Add a signature to the transaction:
safeTransaction.addSignature(signature)
- Execute it by sending prepared data to the blockchain:
const isValid = await protocolKit.isValidTransaction(safeTransaction)if(isValid){ const executedTx = await protocolKit.executeTransaction(safeTransaction) // await receipt using viem/ other libraries by passing executedTx.hash}
And the transaction is complete!
- 0x43a64de96137d8a91b83a8f93674d65611508d03185a15b304e1eb50bfd15091 (add safe owner transaction example)
Step 4C: Using Protocol Kit for Multiple Owners
This method can be executed if users with multiple owners don’t want to use the frontend or the backend service and are in different execution environments.
Scenario: There are two owners of the multisignature wallet. They prefer passing data and executing the transfer in separate environments using the locally accessed library:
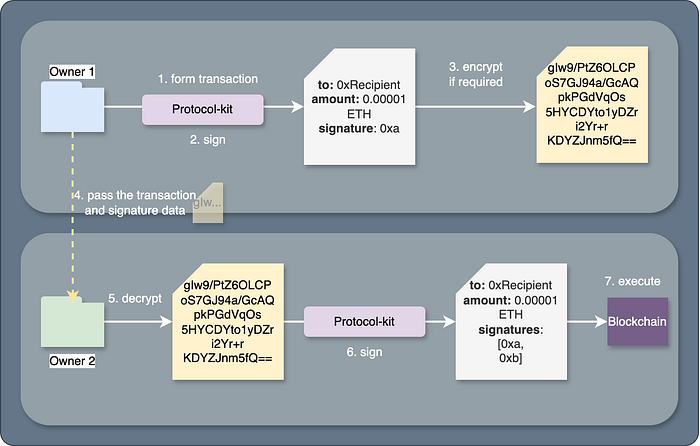
Owner 1 actions:
- Retrieve data from steps 1 to 3 (transfer signature and transaction data) and transform it into a string (can be encrypted).
// prepared safeTransaction and signature// ...const txData = { safeTransaction: safeTransaction.data, safeTxHash, signatures: [signature.data]}const serializedData = JSON.stringify(txData)// encryption in code is skipped
- Pass the serialized/encrypted data to the next owner via secure channels.
Owner 2 actions:
- Parse (and decrypt) the serialized data:
const deserializedData = JSON.parse(serializedData)
- Repeat Step 1 for the second owner. Initialize the protocol kit with the second owner’s signer’s data:
const protocolKitOwner2 = await Safe.init({...})
- Form the transaction using the deserialized data:
const safeTransaction = await protocolKitOwner2.createTransaction({ transactions: [deserializedData.safeTransaction]})
- Add previous owner(s) signatures:
deserializedData.signatures.forEach(sig : SafeSignature => { safeTransaction.addSignature(sig)})
- Sign with the last required signature:
const safeTxHash = await protocolKitOwner2.getTransactionHash(safeTransaction)const signature = await protocolKitOwner2.signHash(safeTxHash)safeTransaction.addSignature(signature)
- Check if the transaction is valid and try to execute it:
const isValid = await protocolKitOwner2.isValidTransaction(safeTransaction)if(isValid){ const executedTx = await protocolKitOwner2.executeTransaction(safeTransaction) // await receipt using viem/ other libraries by passing executedTx.hash}
Executed! Transaction hash:
Transaction data can also be viewed in the UI if the network is supported:
Indexed transaction appears in the supported UI instance
The Second Part is Done!
By now, you should have retrieved funds using the most preferred option. And, as stated in the previous part, this approach works for most of the EVM-based networks, not only zkSync!
If you plan to securely store your funds in a multi-signature wallet and are not sure if the EVM network is supported, check out more about Protofire solutions! As an official Safe partner and Safe Guardian, Protofire ensures your treasury, protocol, or DAO is protected by infrastructure trusted by industry leaders.
- Explore the list of 100+ Safe deployments: https://safe.protofire.io/safes/
- Read more about safes and their extension/solutions: https://safe.protofire.io/
References
- EVM Safe in zkSync. Part I: Recreate Multisigs with EVM Interpreter — https://medium.com/protofire-blog/evm-safe-in-zksync-part-i-recreate-multisigs-with-evm-interpreter-fe0b9dc84ce2
- Protofire Safe UI — https://app.safe.protofire.io/
- Safe Cli — https://github.com/safe-global/safe-cli
- Safe Core SDK — https://github.com/safe-global/safe-core-sdk
- How to perform basic transactions checks on Safe{Wallet} https://help.safe.global/en/articles/276343-how-to-perform-basic-transactions-checks-on-safe-wallet
- Safe Transaction Service — https://github.com/safe-global/safe-transaction-service
Share this article on
Share this article on